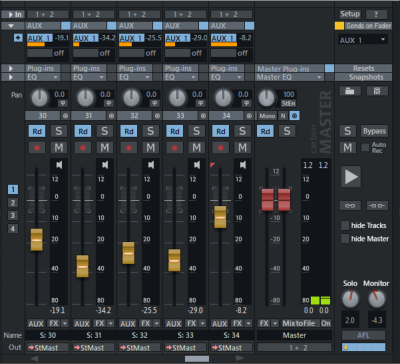
Global Mixer Functions
At the edges of the mixer window there are a number of buttons for cross-track control of the mixer window and mixer behavior.
Mixer Setup and Help
|
|
Setup: Click on the Setup button to open the Mixer Setup dialog. ? opens the help for the mixer, i.e. the text you are just reading. |

Sends on Fader
With this function you place the small sliders for one AUX path each on the large channel faders. This makes it more convenient to set and compare the AUX send level for the tracks. (This corresponds to the AUX page on digital mixers, as these usually do not have separate AUX controls)
 Select an AUX bus from the list box to activate the function. The function can be switched on and off by clicking on the yellow button.
Reset Mixer
The buttons under Resets allow you to reset various properties of the mixer.
|
|
Reset AUX: This resets all AUX sends. Reset EQ: This resets all equalizer settings. Reset Peaks: This resets the LED peak meters (peak hold display). Reset FX: This removes the effects in all channels. |
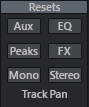
Reset (Mono): This resets the entire mixer to its default settings for mono tracks. The tracks are alternately set to 100% Right and Left
Reset (Stereo): This resets the entire mixer to its default settings for stereo tracks. The pan controls are set to center position and all special track pan settings are reset.
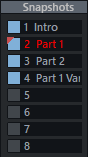
Loading and Saving Mixer Settings
|
|
You can save the state of the entire mixer into Snapshots. (For hardware mixers this is called "Total Recall"). This includes the levels of all volume and AUX send controls as well as all track effect settings and routings. Click one of the buttons to save. To load the snapshot, click this button again. To overwrite a saved snapshot, click the button while holding down the Shift key. Double-click in the name window to name the snapshots. The last loaded snapshot is highlighted. |
|
|
Load mixer settings / Save mixer settings: With these buttons you can save the current mixer settings to a file (*.mix) to use them in other projects and load saved mixer settings. |

In the context menu of a snapshot button you can reach further functions:
-
Load/Save Snapshots: This corresponds to the function of the button, Delete Snapshot deletes the snapshot from the button
-
Next Bank/Previous Bank: A project can contain a total of 32 snapshots in 4 banks, use these commands to change the displayed bank.
-
Save mixer to file: This corresponds to the function of the Save mixer settings buttons (without snapshots).
-
Save mixer with snapshots: Use this option to save the current mixer settings and all snapshots. When loading mixer settings that contain snapshots, you are asked whether the snapshots should also be loaded. If so, the snapshots of the project are overwritten by all snapshots of the file.
-
Load mixer from file / Load mixer from file (including track names): You can load mixer settings both with and without track names.
-
Load last mixer: When loading a snapshot, the current mixer settings are temporarily cached and can be retrieved with the command Load last mixer. This also allows an A-B comparison between the snapshot's and the current settings.
-
Include record/monitoring states: If this option is activated, the record arm and monitoring states are also adjusted when loading snapshots and mixer files.
With Menu View > More > Load Mixer Snapshot you open a menu from which you can select the desired entry with the arrow keys and confirm it with the Enter key. If you also assign a keyboard shortcut to this menu item, you can switch snapshots in this way completely keyboard controlled.
Playback Functions
|
|
Solo/Mute: Use the S and M buttons to toggle all Solo/Mute buttons on and off. Bypass: This button allows you to turn off all effects active in the project except for the volume and pan settings of the channels for comparison purposes. AutoRec: This display will light up if the level automation is written in the master. |
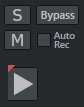
Play/Stop: This button can be used to play and stop the project, a right click opens the transport console.
View
|
|
Hide Tracks/Hide Master: These buttons can be used to hide the tracks or the master section in the mixer. |


In the Track Manager, you can also hide individual tracks in the mixer. The four snapshot buttons allow you to save this visibility state of the tracks together with the current section, i.e. the first track displayed in the mixer, and then restore a specific view with one click. To save, click one of the four buttons on the left edge of the mixer. To load the snapshot, click this button again. To overwrite a saved snapshot, Shift-click the button.
With Menu View > More > Load Mixer Layout Snapshot you open a menu from which you can select the desired entry with the arrow keys and confirm it with the Enter key. If you also assign a keyboard shortcut to this menu item, you can switch the layouts in this way completely keyboard controlled.
Solo and Monitor Control
At the bottom right, there are basic setting options for the monitor control.
For more options and settings for monitoring, use the Monitoring Section.
|
|
The Solo knob determines the monitoring volume in solo mode, while the Monitor knob additionally influences the level at the monitor output. The value corresponds to the Volume setting in the Monitoring section. The monitor output can be selected at the very bottom. This corresponds to the first output device of the monitoring section. Monitoring via separate monitor buses is only available when using the hybrid engine. |
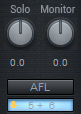
Via the switch AFL/PFL you can tap the signal for solo playback in two different places:
-
PFL: With PFL (Pre Fader Listen), the signal is tapped before the volume fader and effects, but after the input gain.
-
AFL: With AFL (After Fader Listen), tracking effects, pan and volume settings are taken into account and affect the monitoring signal.
This switch corresponds to the Global Solo mode Global: Solo PFL
In general, the monitor bus behaves like "Main to Monitor", meaning that the content of the master can be heard at the same time on the monitor bus. As soon as Solo is activated, only tracks in solo status are output via the monitor bus.
Global Solo Modes
The button for selecting the monitor bus allows you to define global default settings for solo playback. This can also be accessed by right-clicking on the solo buttons.

Global: Solo In Place Solo in Place lets you hear the channels set to Solo in the mixer as they are placed in the stereo image of your mix. Simultaneously, all other channels are muted. This solo mode is typically used during the mixdown to identify single instrument tracks and edit them individually. This option is active by default.
Global: Solo Safe. In Solo In Place mode, this option causes any channel switched to Solo to automatically be listened to along with the AUX Return channels it is feeding. This option is active by default.
Global: Mute/Solo Safe Pre Sends (only available in Hybrid mode). This is an additional "Solo Safe" function for AUX sends/outs configured as pre or direct sends.
Global: Solo PFL (only available in Hybrid mode) You can also access this option via the AFL/PFL button. It sets the behavior of the solo tracks to PFL. In this case, the signal is tapped before the fader and effects, but after the input gain. In the deactivated state, the solo tracks are tapped after the fader.
Note: Economy Tracks cannot be monitored with PFL.
Global: Solo Exclusive: In this mode, the Solo button switches this channel exclusively to Solo. For all other channels the solo status is cleared. If you also want to listen to the AUX return channels of the "Solo" switched channels, Global: Solo Safe must also be active.
Note: If the mode Global: Solo Exclusive is not active, click with Shift + Alt on the "Solo" button of a channel for Solo exclusive. Conversely, if "Solo Exclusive" is active, you can listen to multiple channels at the same time in "Solo" state using the same key combination when you click Solo.
Global Solo modes without monitor bus
If you cannot or do not want to use the Hybrid Engine or do not want to use a Monitor Bus for other reasons, you can also select Monitor Bus inactive (---). The following differences then exist:
-
Solo In Place is always active and cannot be deactivated.
-
Also in "Solo in Place" mode it is possible to switch between Pre Fader Listen and After Fader Listen. With a monitor bus, PFL is no longer In Place.
Attention: In this mode it is possible to influence the master level with the monitor control. This means you can set up the listening level in the mixer without using any external volume controllers. The audible result in this case differs from the peak meter display. Therefore, the numerical level values in the mixer are displayed in red. Additionally, the Solo knob influences the volume of the soloed tracks that are played through the master section. However, the internal level for the export remains unchanged.